Npsp Data Import Template
Npsp Data Import Template - Add a new column after contact1 last name, and enter contact1 preferred language in the header row. Use the salesforce data import wizard (in salesforce setup), or an external data import application (such as salesforce data loader, demandtools, apsona, jitterbit, informatica, etc.) to upload your data to salesforce. Add another column after your new contact1 preferred. You’ll see a list view with several buttons in the upper right corner. Each row contains the data you’re importing into contacts, accounts, addresses, opportunities, or other objects. Download the templates from the link in the resources section below to use with your own data when you import for real after practicing in this module. Web modify the npsp data import template to support additional fields and objects. In the what kind of data are you importing? section, make sure the custom objects tab is selected, and then click npsp. Web this article includes reference information about the fields in the npsp data import object, the mapping to target npsp objects, and information about columns in the npsp data importer templates , especially requirements for date fields. Web find the importer through the app launcher to get started.
Web to help with that process, we created npsp data importer templates with the instructions and column headers you need to format your data for either a simple import or advanced mapping features. Import wizard template uses field labels to match data, while data. Each column represents a field on one of several objects. Download the templates from the link in the resources section below to use with your own data when you import for real after practicing in this module. There are two tabs where you can enter data: Web successfully importing data using the npsp data import tool is a challenge for many nonprofit customers, especially crafting your files and deciphering all of the column headers in the import template. Web this article includes reference information about the fields in the npsp data import object, the mapping to target npsp objects, and information about columns in the npsp data importer templates , especially requirements for date fields. Make sure you complete the install nonprofit success pack (npsp) into a trailhead playground project. You’ll see a list view with several buttons in the upper right corner. In the what kind of data are you importing? section, make sure the custom objects tab is selected, and then click npsp.
Web upload data from the template click the app launcher ( ). Web to help with that process, we created npsp data importer templates with the instructions and column headers you need to format your data for either a simple import or advanced mapping features. Each row contains the data you’re importing into contacts, accounts, addresses, opportunities, or other objects. There are two tabs where you can enter data: Web find the importer through the app launcher to get started. Download the templates from the link in the resources section below to use with your own data when you import for real after practicing in this module. Web first, go to the npsp data importer templates page in documentation and download the accounts and contact import template. Import wizard template uses field labels to match data, while data. Each column represents a field on one of several objects. In the what do you want to do? section, select add.

Npsp Data Import Template Portal Tutorials
Web to help with that process, we created npsp data importer templates with the instructions and column headers you need to format your data for either a simple import or advanced mapping features. Add a new column after contact1 last name, and enter contact1 preferred language in the header row. Each row contains the data you’re importing into contacts, accounts,.

NPSP Data Model by Example Part 2 YouTube
Download the templates from the link in the resources section below to use with your own data when you import for real after practicing in this module. Web successfully importing data using the npsp data import tool is a challenge for many nonprofit customers, especially crafting your files and deciphering all of the column headers in the import template. Web.

Import Templates Tadabase
Use the salesforce data import wizard (in salesforce setup), or an external data import application (such as salesforce data loader, demandtools, apsona, jitterbit, informatica, etc.) to upload your data to salesforce. Web upload data from the template click the app launcher ( ). Each row contains the data you’re importing into contacts, accounts, addresses, opportunities, or other objects. Web this.

NPSP Data Model by Example Episode 2 Trailhead Live
Open it, go to the import wizard template tab, and then let's add our new fields. Web upload data from the template into the npsp data import custom object. Find and select npsp data imports in the app launcher ( ). Each row contains the data you’re importing into contacts, accounts, addresses, opportunities, or other objects. In the what kind.

Craftsman Technology Group NPSP Data Import Advanced Mapping
Web go to the npsp data importer templates page and download the donation import (individuals) template. Web first, go to the npsp data importer templates page in documentation and download the accounts and contact import template. Download the templates from the link in the resources section below to use with your own data when you import for real after practicing.
The Excel Import Template Document
Download the templates from the link in the resources section below to use with your own data when you import for real after practicing in this module. Web go to the npsp data importer templates page and download the donation import (individuals) template. Web successfully importing data using the npsp data import tool is a challenge for many nonprofit customers,.
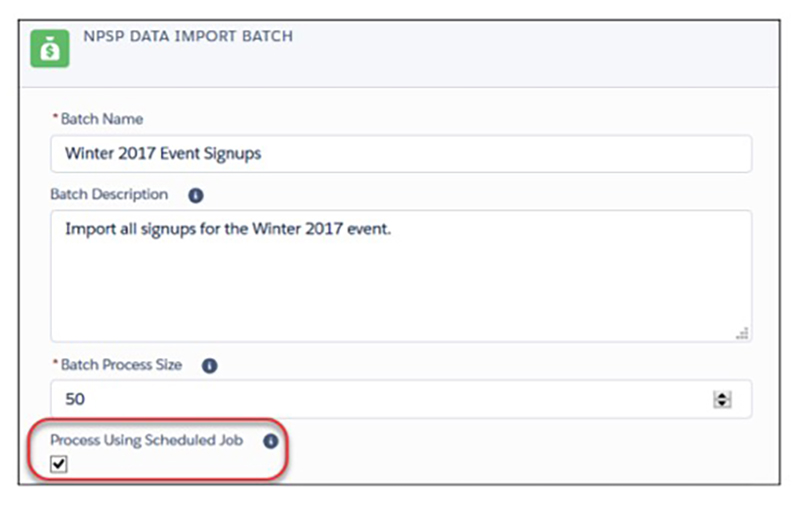
New in the Nonprofit Success Pack (NPSP) Batch Data Import
Add a new column after contact1 last name, and enter contact1 preferred language in the header row. Web find the importer through the app launcher to get started. Web upload data from the template click the app launcher ( ). Web modify the npsp data import template to support additional fields and objects. There are two tabs where you can.

What’s new with the Nonprofit Success Pack (NPSP)? November Updates
Import wizard template uses field labels to match data, while data. Web go to the npsp data importer templates page and download the donation import (individuals) template. Web modify the npsp data import template to support additional fields and objects. Web open one of the npsp data importer templates in your favorite spreadsheet application so you can see how the.
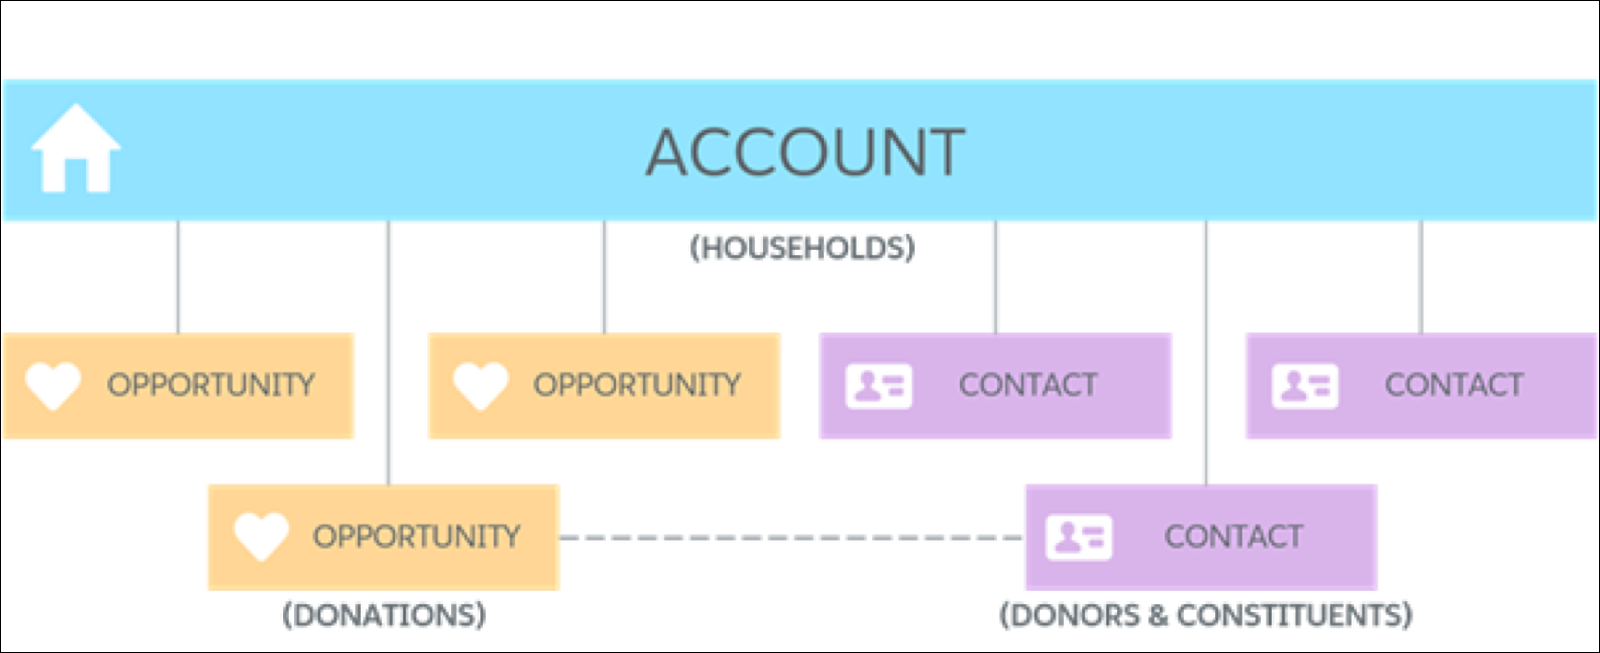
Understand the NPSP Data Model Unit Salesforce Trailhead
Each column represents a field on one of several objects. Web successfully importing data using the npsp data import tool is a challenge for many nonprofit customers, especially crafting your files and deciphering all of the column headers in the import template. In the what kind of data are you importing? section, make sure the custom objects tab is selected,.

Npsp Data Import Template Portal Tutorials
Add a new column after contact1 last name, and enter contact1 preferred language in the header row. Web go to the npsp data importer templates page and download the donation import (individuals) template. Make sure you complete the install nonprofit success pack (npsp) into a trailhead playground project. Web upload data from the template into the npsp data import custom.
In The All Items Section, Click Npsp Data Imports.
Web this article includes reference information about the fields in the npsp data import object, the mapping to target npsp objects, and information about columns in the npsp data importer templates , especially requirements for date fields. Find and select npsp data imports in the app launcher ( ). Each row contains the data you’re importing into contacts, accounts, addresses, opportunities, or other objects. Web first, go to the npsp data importer templates page in documentation and download the accounts and contact import template.
Import Wizard Template Uses Field Labels To Match Data, While Data.
Web successfully importing data using the npsp data import tool is a challenge for many nonprofit customers, especially crafting your files and deciphering all of the column headers in the import template. Use the salesforce data import wizard (in salesforce setup), or an external data import application (such as salesforce data loader, demandtools, apsona, jitterbit, informatica, etc.) to upload your data to salesforce. Web upload data from the template into the npsp data import custom object. In the what do you want to do? section, select add.
Add A New Column After Contact1 Last Name, And Enter Contact1 Preferred Language In The Header Row.
Web upload data from the template click the app launcher ( ). Add another column after your new contact1 preferred. Web find the importer through the app launcher to get started. Make sure you complete the install nonprofit success pack (npsp) into a trailhead playground project.
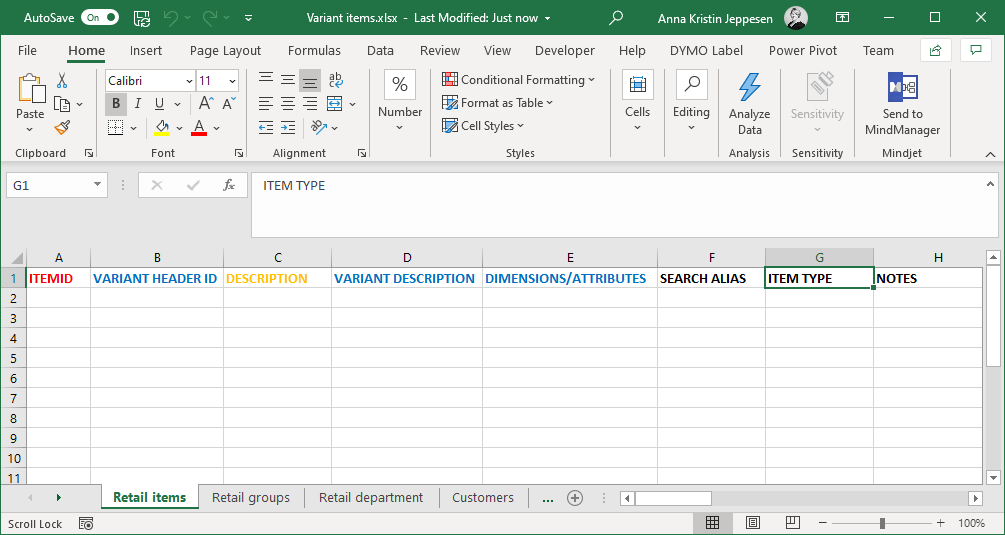
There Are Two Tabs Where You Can Enter Data:
Web to help with that process, we created npsp data importer templates with the instructions and column headers you need to format your data for either a simple import or advanced mapping features. You’ll see a list view with several buttons in the upper right corner. Download the templates from the link in the resources section below to use with your own data when you import for real after practicing in this module. You’re now in the data import wizard and ready to.